After working my way through daunting tasks while setting up my Raspberry Pi 2 B+ with Ubuntu Arm. I figured they may be other people who want to work their way through these problems so here is a post that I hope helps you all.
First step is to decide which operating system you want to use. The raspberrypi.org has a host of OS downloads and you can find them here: https://www.raspberrypi.org/downloads/.
I however did not get my program from this page and I am instead running Ubuntu 14.04.3 which was a little be more tedious to set up and unless you have a particular reason to go this route i.e (ROS/Robot Operating System support) then I would recommend doing something more simple. Again, I would stress another route. Secondly when you decide which operating system you would like you then need to have a microSD card ready to put the image file (IO) onto. Most recommend at least 8gig size but the larger the better.
You will then need to download Win32 disk imager in order to make your SD card ready to be installed once placed in the Pi. You can find this download here: http://sourceforge.net/projects/win32diskimager/. Be very careful when doing this process for if you select the wrong drive to image you could wipe whatever drive you select. I would recommend unhooking all usb drives and extra memory cards you may have hooked to the computer you are using to do the imaging. Then I would recommend opening your "mycompter" folder or whatever Mac OS equivalent you have and taking a look at the correct drive label of the SD card you are going to image. Then open up the imager and follow the directions.
After this is done you can eject the sd card from your computer and place it in your pi. Hook up your monitor, keyboard, and mouse and then power it up.
If no connection is registered on your monitor and nothing shows up, you can fix this by putting the sd card back into you computer and navigating your way to the config.txt file on the sd. I believe it can be located first page as soon as you open up the sd. You can simply uncomment the code where it says HDMI_Mode=1 and HDMI_Force_Hotplug=1 by removing the #'s. A better solution, as this may cause the desktop to not auto detect the ratio need for the monitor, would be to find out the model of your monitor or at least the correct resolution and refresh rate and follow the directions here: https://www.raspberrypi.org/documentation/configuration/config-txt.md. Over-clocking your Rasp Pi (making it run faster) can also be done by editing this file. (using nano, a command line text editor.)
In the command line, type the following:
sudo nano /boot/config.txt
enter your password.
Then when the file pops up, somewhere in the file, (preferably and empty space area) add the following.
arm_freq=1000
core_freq=500
sdram_freq=500
over_voltage=2
then press ctrl + shift + O to write (save) to the file
then press ctrl + shift + X to exit the file, then reboot by typing
sudo reboot
If you end up going the route I did and install the same Ubuntu then the directions and download for this can be found here: https://wiki.ubuntu.com/ARM/RaspberryPi. Everything is done using the command line so it can get a little uncomfortable if you are not familiar with Linux.
It it easier to follow along with this video ---> https://www.youtube.com/watch?v=UGSQ7nzVCs4
he does a very good job explaining everything. Follow those directions and you will be fine. When the guy says you can use any text editor you want but he then uses mg, I would recommend avoiding that editor and instead using nano which is a text editor you can access from the command line. (sudo nano "fileExtension") Warning, it will take awhile. I would recommend just doing one of the simple installations of an OS from raspberrypi.org.
Finally, for those who are having issues with the ridiculous slow moving mouse pointer. First navigate to your mouse settings and speed them all the way up. Then, all you have to do is open up the command line. You will then edit the cmdline.txt file located in your /boot folder.
follow these instructions. type:
sudo nano /boot/cmdline.txt
add this anywhere in the file:
usbhid.mousepoll=0
then press ctrl + shift + O to write (save) to the file
then press ctrl + shift + X to exit the file, then reboot by typing
sudo reboot
That should get you started. If anyone has any questions feel free to ask. I may not have all the answers but Ill try to help you through your issue.
Saturday, January 23, 2016
Thursday, January 21, 2016
Chose an Operating System and Direction
I did a little bit of research on which OS would be best to run on a Pi and/or do a project with yesterday. I decided to go with the ROS or Robot Operating System. Details can be found here:
http://www.ROS.org and http://wiki.ROS.org. This had actually presented me with another learning curve. Unfortunately the only fully supported OS for ROS is Ubuntu Linux as shown here: http://wiki.ros.org/ROS/Installation. I do not have any experience with any of the Linux style operating systems, so I have a long road ahead of me. Apparently once I get the basics down, there is a lot I could end up doing with my robot and ROS, and there is very large community of support out there.
On another note, a few items came in today. The Keys RPI GPIO shield. With a little maneuvering and loosing the top level of my multilevel case I was able to attach it. I also lost my fan, so I will have to be careful since I overclocked my Pi. The cable coming out is for the HD/IR camera.


Two Ultrasonic Distance sensors from Sunfounder. (HC-SR04)

and also Two Sharp IR distance sensors. (GP2Y0A21YKOF)

Also, I did a little testing and it seems that the Goal Zero battery pack from the Goal Zero solar charging set I had laying around puts out 5V and powers up the Raspberry Pi 2 just fine.


Thanks for reading, and check back later. I keep you updated as I advance along.
http://www.ROS.org and http://wiki.ROS.org. This had actually presented me with another learning curve. Unfortunately the only fully supported OS for ROS is Ubuntu Linux as shown here: http://wiki.ros.org/ROS/Installation. I do not have any experience with any of the Linux style operating systems, so I have a long road ahead of me. Apparently once I get the basics down, there is a lot I could end up doing with my robot and ROS, and there is very large community of support out there.
On another note, a few items came in today. The Keys RPI GPIO shield. With a little maneuvering and loosing the top level of my multilevel case I was able to attach it. I also lost my fan, so I will have to be careful since I overclocked my Pi. The cable coming out is for the HD/IR camera.


Thanks for reading, and check back later. I keep you updated as I advance along.
Monday, January 18, 2016
Project Decision. Robot Poject Jarvis ≈ 3.14159
Project Jarvis ≈ 3.14159 has the possibility to do many things. For now I am knocking around a few ideas. A few of those possibilities include:
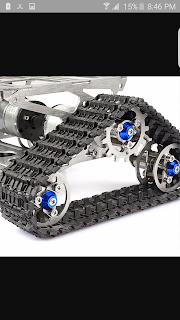
http://www.sainsmart.com/all-metal-robot-tracks-development-platform-fpv-for-arduino.html


- IR Camera recording and detection. This can be used in avoidance with or to locate follow people. It can also be used to find heat leaks on the outside of buildings.
- An active connection to the internet for video or directly to the device that is used in operation with the robot.
- It will include an air quality sensor that can be used to map out air quality inside and outside of buildings in certain areas. This could be possibly be used to build out a visual map.
- There will be a temperature and relative humidity sensor.
- A mini OLED display. what it will display I am not quite sure yet...
- Jarvis will have a track system with 2 12v/350rpm motors. 8kg/17.5lb max load on its steel frame/platform.
- With web access Jarvis can access googles GEOapi up to 2500 times (allow amount) a day to keep an accurate log of where it was for the information it gathered.
- It will include an ultrasonic ranging and distance sensor to aid in obstacle detection.
- It will have IR proximity sensors to detect stairs or edges.
http://www.sainsmart.com/all-metal-robot-tracks-development-platform-fpv-for-arduino.html


Wednesday, January 13, 2016
Hardware


A goal zero solar energy panel.

We will see what i can think of.
Subscribe to:
Posts (Atom)